

Embroidery Tutorial - How To Transfer Embroidery Patterns Onto Fabric With Your Home Printer
Choosing a method to transfer an embroidery pattern onto fabric can be confusing. Different methods serve different purposes, but knowing how to accomplish this with your home printer makes it so simple! Make sure you read through all of these instructions first, and check out the important extra considerations at the bottom of this tutorial.
Supplies you will need:
-Fabric – almost any fabric that is appropriate for hand embroidery should work.
-Digital pattern – the Lolli & Grace “Heart And Hand” pattern I am showing in this tutorial is available in the Lolli & Grace Etsy store.
-Freezer paper – available in most grocery stores.
-Iron
-Press cloth – I use an inexpensive piece of un-dyed muslin as a press cloth.
-Inkjet Printer
Steps for printing your embroidery pattern onto fabric:
1. Cut a piece of freezer paper that is 8 1/2″ x 11″.
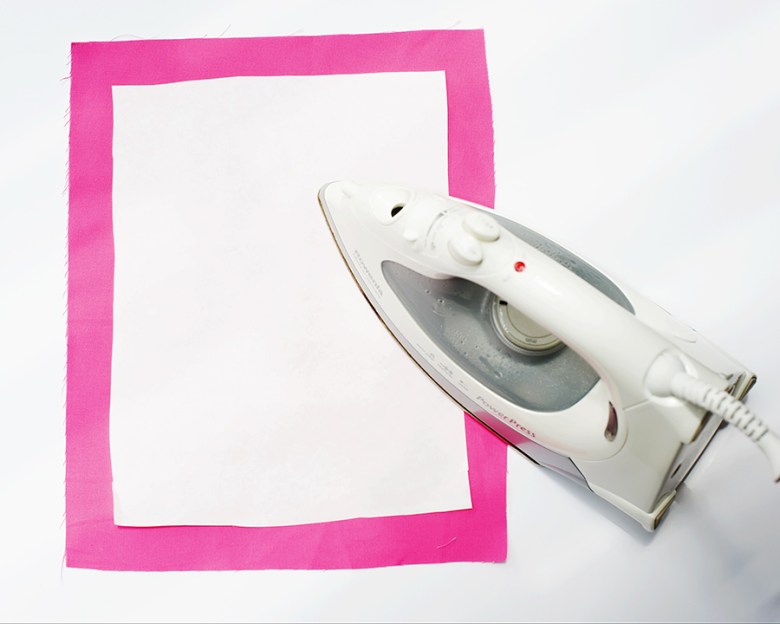
2. Set your iron to high heat, no steam. It’s always a good idea to iron your fabric first so it lays nice and flat. After your fabric is cool, place the 8 1/2″ x 11″ piece of freezer paper onto your fabric with the shiny side DOWN.
3. Place the press cloth on top of the freezer paper and gently move the iron over consecutive areas. Iron each area for about 7-10 seconds. The trick here is to cover all the areas of the freezer paper for long enough that the wax melts and sticks to the fabric, without ironing any one section for too long. (Note: I forgot to show the press cloth in this next photograph – it’s not absolutely essential to use a press cloth, but I always do, just in case a little bit of wax melts around the edges of the paper. And I do not want to worry about an iron that has wax on it the next time I need to iron something.)
4. Allow the freezer paper/fabric to cool. Gently check all areas of the fabric to make sure the freezer paper is adequately adhered to the fabric. The corners and edges are especially important, as those areas will need to be secure as it all goes through the printer.
5. Once you are assured that your freezer paper is adequately ironed onto your fabric, cut along the edges. Now you will have a piece that is 8 1/2″ x 11″ with fabric on one side and paper on the other.

6. Now you need to make sure your digital pattern is ready to print onto your fabric. Here are the considerations to keep in mind before you print onto your fabric:
-Make sure the pattern is centered on the page, both vertically and horizontally. This will give you the maximum amount of fabric surrounding the design so it will fit in the hoop.
-Make sure there are no other designs or any text that will be printed, because this fabric will be placed in your hoop and stay there permanently. Obviously, you don’t want any other designs or text showing on your fabric.
-It is unlikely you will need to print the design at 100% opacity. You will be stitching directly on top of the printed design, so you want the ink to be as light as it can be so it won’t show under your stitches. In other words, you want it just dark enough that you can see the lines, but not so dark that it will show under your stitches. Most PDF viewers should allow you to change or reduce the opacity of your file. For white or really light fabrics, you can reduce the opacity quite a bit. For a medium-colored fabric like the pink fabric shown here, you should do some test prints first to determine the opacity that works best. Because of that, I recommend purchasing enough fabric so you can do at least one, two or even three tests first. It took me three tries to choose the opacity that worked best on this pink fabric. It was a “Goldilocks” experience at my house for a bit – the first try (at 100% opacity) was TOO DARK. The second try (at about 30% opacity) was TOO LIGHT. The third try (at 60% opacity) was JUST RIGHT.
-When choosing your printer settings, I recommend using either the “Normal” or “Fast Draft” setting. The fast draft setting will place less ink on the surface, which is better (and will also play in to how dark or light the pattern prints).
-Use a plain sheet of paper in your printer first to determine how to load your paper/fabric so you understand on which side of the paper the printing will occur. For my printer, I load the paper so that the side on which I want it to print is facing down. But your printer may be different.
7. Once you’ve done all of that, load your fabric/paper into the printer and print it. Here is what the opacity looked like for the pink fabric shown here:

8. Once you have printed your design onto the fabric, peel the freezer paper off the back.

9. Place the printed fabric in your hoop, making sure the fabric is taut. Be careful not to stretch the fabric unevenly, as this could distort the shape of your pattern.

10. Trim the fabric around the edge of the hoop, leaving enough extra fabric so you can finish it later with whichever method you choose. Using pinking shears reduces the amount of stray threads that could catch in your needle as you work.

11. Choose your threads and start stitching!
A few considerations to keep in mind with this method:
-It works really well on white, light or even medium-colored fabrics. Obviously it’s not going to work on black or really, really dark fabrics.
-You must use an inkjet printer. If you use a laser printer, the heat from the printer will melt the wax on the freezer paper and you could end up with a big mess in your printer.
-This method can only be used on patterns that require a piece of fabric that is 8 1/2″ x 11″ or smaller (unless you have a large format printer). Remember to keep in mind that you have to allow not only for the size of the pattern itself, but also leave enough fabric around the design to stretch in your hoop.
I used this method to print this same design on green linen. Here is the finished hoop:

You can find the “Heart & Hand” pattern and many more in the Lolli & Grace Etsy store.
Click HERE to get this pattern.
I hope this tutorial was helpful. Happy stitching!