

Lolli and Grace One Meaningful Word #8 "Castle In The Sky" Stitch Along - Supply List And Schedule
One Meaningful Word #8 "Castle In The Sky" Stitch Along Information
In today's post there are two important details for you below...a supply list and dates for the stitch along. First, let's talk about the schedule.
"Castle In The Sky" One Meaningful Word #8 Stitch Along Schedule
• There will be SIX parts to this stitch along.
• The stitch along will start on Saturday, April 6th
• Part Two - Saturday, April 13th
• Part Three - Saturday, April 20th
• Part Four - Saturday, April 27th
• Part Five - Saturday, May 4th
• Part Six - Saturday, May 11th
Remember - once they've been published, all six parts will stay on the blog for the duration of the Stitch Along and for a short while after it finishes. If you don't finish your hoop while the SAL is ongoing, don't panic! If you purchased either a kit, fabric panel, or the PDF line drawing during the SAL and the info has been moved off of the blog, just contact me and I will be happy to send you the instructions.
At some point after the SAL is over, I will remove everything from the blog and it will all be available in the Lolli and Grace shop. If you think it's going to be a while before you're able to finish it, you are welcome to print out the instructions and patterns for your personal use later.
Supply List
Want to purchase a One Meaningful Word #8 Supply Kit that includes everything you need for this SAL instead of gathering your own supplies? I got you covered (assuming they haven't sold out). Click on the link below to get one:
Complete Supply Kit - One Meaningful Word #8 "Castle In The Sky"
If you want to purchase one of options for the pre-printed fabric panels, click this link:
Pre-Printed Fabric Panels - One Meaningful Word #8 "Castle In The Sky"
However, if you are not purchasing a supply kit or fabric panels and want to transfer the design onto your own fabric, you'll need to purchase the PDF line drawing. There will be detailed instructions in the Part One video tutorial about how to do this. You can purchase the PDF line drawing by clicking on the link below:
PDF Line Drawing - One Meaningful Word #8 "Castle In The Sky"
If you are gathering all of your own supplies, here is what you will need to complete this hoop. Everything that is highlighted is an active link that you can click on to purchase that product:
• 8” embroidery hoop for main (castle) design
• 6" embroidery hoop for stumpwork butterfly
• Cotton twill tape (optional but very helpful - for wrapping your hoop to keep fabric tight)
• Fat square of white cotton fabric
• Markers (#443 and #725)
• 100% wool felt "Cerise"
• Pellon 805 "Wonder Under"
• Pigma Micron Permanent pen size 03 (05 is fine, too)
• #26, #24, and #20 chenille needles
• Embroidery Floss (see details below)
• 9" square of polyester felt for hoop backing
Additional Tools And Supplies
• Cling Wrap (if dyeing fabric and threads)
• Spray bottle (if dyeing fabric and threads)
• Iron (if you are adding the word banner)
• 8-1/2" x 11" label paper (if transferring design with your home printer)
• Sewing machine (if transferring design with your home printer, but you could also probably stitch this step by hand)
• Plastic gloves (if dyeing fabric and threads)
• 5-inch Micro Tip detail scissors
• Wire cutters or strong scissors (not your good fabric scissors!) to cut wire
Embroidery Thread Information
There are two options for the threads for this design.
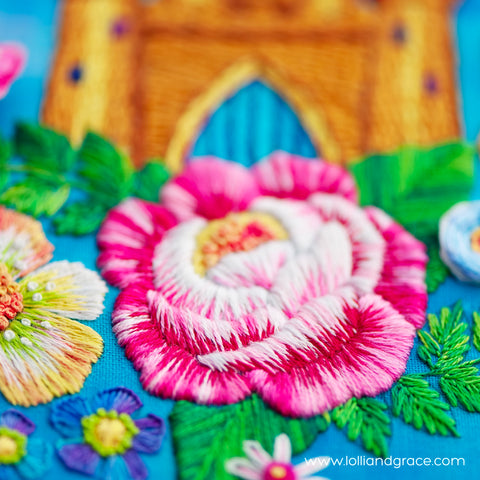
I will be teaching you how to dye some of your own threads for this design. These are the threads used for the sample you see in all of the photos. (We will be using a combination of purchased thread colors and hand-dyed threads.)
However, if you just don't want to spend the time to dye your own, you could use all purchased threads. There are reasonably similar substitutions for almost all of the colors, except for the pink threads, so be aware that if you use purchased (non-dyed) threads the pink areas (especially on the big peony and the butterfly wings) will look different from what you see on the sample and what is shown in the video tutorials.
Here are the thread supply lists for both options:
DMC Thread Colors And Amounts (If You Are Dyeing Your Own)
• White/Blanc (need three or four skeins)
• 304 - Red Medium (need one skein)
• 434 - Brown Light (need one skein)
• 718 - Plum (need one skein)
• 726- Topaz Light (need two skeins)
• 783 - Topaz Medium (need one skein)
• 907 - Parrot Green Light (need two skeins)
• 3846 - Bright Turquoise Light (need two skeins)
DMC Thread Color And Amounts (If You are NOT Dyeing Your Own)
• White/Blanc (you will need ONE or TWO skeins)
You will need ONE skein of each of the following colors:
• 304 - Red Medium
• 434 - Brown Light
• 718 - Plum
• 726- Topaz Light
• 783 - Topaz Medium
• 907 - Parrot Green Light
• 3846 - Bright Turquoise Light
• 4180 - DMC Color Variations Rose Petals
• 3806 - Cyclamen Pink Light
• 3804 - Cyclamen Pink Dark
• 796 - Royal Blue Dark
• 906 - Parrot Green Medium
• 3818 - Emerald Green Ultra Very Dark
• 90 - Variegated Yellow
• 3853 - Autumn Gold Dark
• 4245 - DMC Color Variations Mystical Midnight
• 4220 - DMC Color Variations Lavender Fields
Once again, that's a lot of information, but it's definitely important. I can't wait for you all to start stitching this design!